¶ Managing Database Views
Creating specialized data views is a powerful way to present aggregated or filtered information in your application. Whether you are adding a standard Database View or an internal Custom View, RadSystems Studio uses a consistent interface to help you define the underlying query logic.
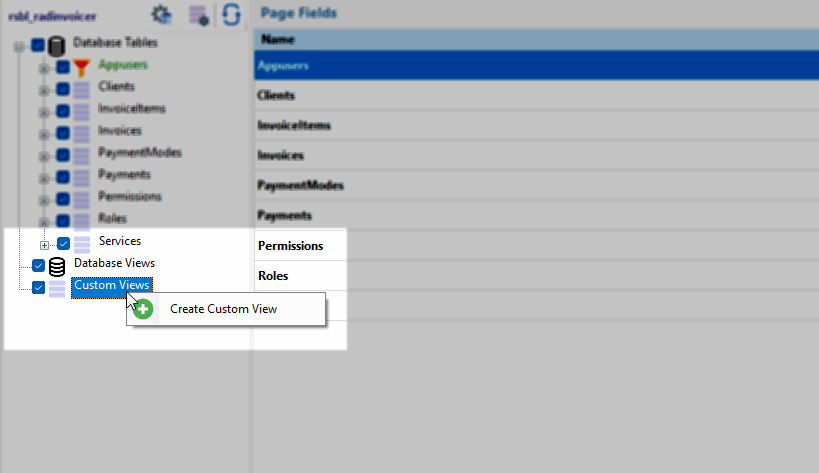
To begin the process, navigate to the sidebar workspace, right-click on either the Database Views or Custom Views category, and select the Create Custom View button.
¶ Add Data View Configuration
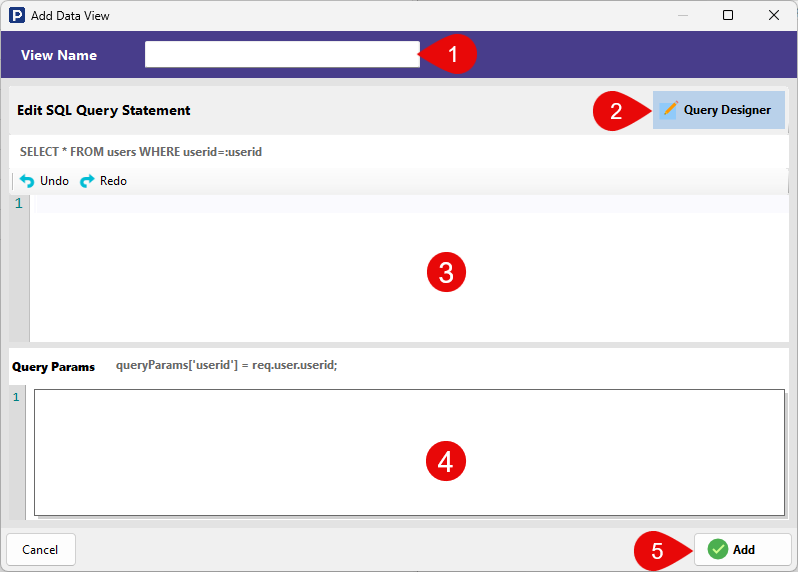
The Add Data View window provides a structured environment to name your view and define the SQL logic that powers it.
¶ 1. View Name (1)
Enter a unique, descriptive name for your view in this field. This name will be used as the identifier in your project sidebar and typically serves as the default title for the generated list page.
¶ 2. Query Designer (2)
Click the Query Designer button to launch the visual Database Query Builder. This allows you to build your SQL statement using the drag-and-drop interface, defining tables, joins, and filters without writing raw code. Once you click "Okay" in the designer, the generated SQL will be automatically populated into the editor below.
¶ 3. Edit SQL Query Statement (3)
This is the primary code editor where your view's SQL logic resides.
-
Manual Editing: If you prefer writing raw SQL or need to fine-tune the output from the Query Designer, you can type directly into this area.
-
Syntax Support: The editor includes Undo and Redo buttons to help manage your changes.
-
Dynamic Filters: You can use placeholders (e.g.,
:userid) to create dynamic queries that filter data based on specific parameters.
¶ 4. Query Params (4)
This section allows you to define the values for any placeholders used in your SQL statement.
-
Parameter Mapping: You can map your SQL placeholders to application variables.
-
Example: To filter the view based on the currently logged-in user, you might set a parameter like
queryParams['userid'] = req.user.userid;in a NodeJS Express framework as backend. This ensures that each user only sees records relevant to them. Note that the way the dynamic param is fetched depends on the backend framework you're using.
¶ 5. Add View (5)
-
Cancel: Discards your current configuration and returns to the main workspace.
-
Add: Click this button to finalize the view. RadSystems Studio will validate the SQL and add the new view to your project tree, ready for page configuration.
Managing your existing views is a straightforward process handled directly within the database tree of your workspace. Whether you need to refine a complex query or remove an outdated data set, RadSystems Studio provides direct context menu actions to manage these entities.
¶ How to Edit or Delete Views
To perform management tasks on a view, locate the specific entity under the Database Views or Custom Views section in the sidebar tree and follow these steps:
¶ Editing a View
-
Select the View: Locate and click on the view name within the sidebar tree.
-
Access the Menu: Right-click on the selected view to open the context menu.
-
Select Update View: Click the Update View menu option.
-
Modify the Query: This action re-opens the View SQL / Query Builder window explained in the previous section.
-
Save Changes: Make your necessary adjustments to the fields, joins, or conditions and click Okay to save the updated logic.
¶ Deleting a View
-
Select the View: Highlight the view you wish to remove from the sidebar tree.
-
Access the Menu: Right-click on the view name.
-
Select Remove View: Click the Remove View menu option.
-
System Impact: The result of this action depends on the type of view being deleted:
-
Database Views: The view will be permanently dropped from your connected database engine.
-
Custom Views: All associated application list pages and logic will be removed from your project.
-
Permanent Action: Once a view is deleted, it is removed immediately from the system. There is no undo feature available for this action, so ensure you truly want to remove the entity before confirming.